
Fourteen months ago I bought a Lenovo IdeaPad 5, specifically model 15IIL05 81YK, from Staples. The other day it started making some cracking sort of noises as I opened and closed it and some of the plastic around the left hinge was deforming. Not much later, the left hinge gave away, barely supporting that side of the screen. I looked online and found that a lot of people have this problem with Lenovo notebooks and there are class action lawsuits about bad Lenovo hinges. On the Lenovo forums, people complained about the problem, but even for computers still under warranty (incredibly pathetic that a hinge would break in the first year of use!), Lenovo feels that physical damage is not covered by their warranty, though they sometimes will relent and fix the problem under warranty anyway. I usually use a credit card that doubles the standard warranty, but for some reason used a card that doesn’t do that in this case. Also I never get an extended warranty, but since this isn’t covered by the warranty, you would have to also get an accidental damage extended warranty. Since mine was out of warranty they would not let me add any kind of warranty now.
UPDATE: Lenovo seems to acknowledge that this is a manufacturing defect and will fix computers with the problem if they are still under warranty. Some people even were able to get repairs covered out of warranty, but this is not universal. You have to open a support case and then post the case number of the support forum and they will contact you to fix it. Dozens, of people have been able to get their laptops repaired via that forum.
At first I was just going to use this computer as a desktop and hook up an external keyboard, mouse, keyboard, speakers, and my extra wide monitor, which I had already done with my 5 year old HP and start using the HP as a laptop again. But the HP is a little clunky and I thought maybe I could fix the hinge on the Lenovo.
Many, many years ago, I had a used Powerbook 520c that had a bad hinge and I was able to adapt some help I found online to install some bolts and washers. I think I wound up doing this for both hinges and the repairs lasted the rest of the life of the notebook, which was a few more years. The hinge itself is metal and doesn’t generally break. Instead the plastic that the hinge anchors into fatigues, cracks, and the metal screws for the hinge come out of the plastic. So you fill up the space with epoxy and once that hardens you drill at the location of the hole in the hinge, through the epoxy and out of the top of the laptop lid (the screen itself isn’t in the way). Then you put a bolt in there. With the Powerbook, the lid was plastic so I used a fender washer, a big 1″ diameter washer to distribute the stress to the outer plastic. But the Lenovo lid is aluminum, so I just used the washers that came with the bolts I used (which seem a little small). The head of the bolt bears on the metal hinge and the nut and washer bear on the aluminum lid, so the epoxy is just a good stiff filler to replace the cracked plastic screw posts.
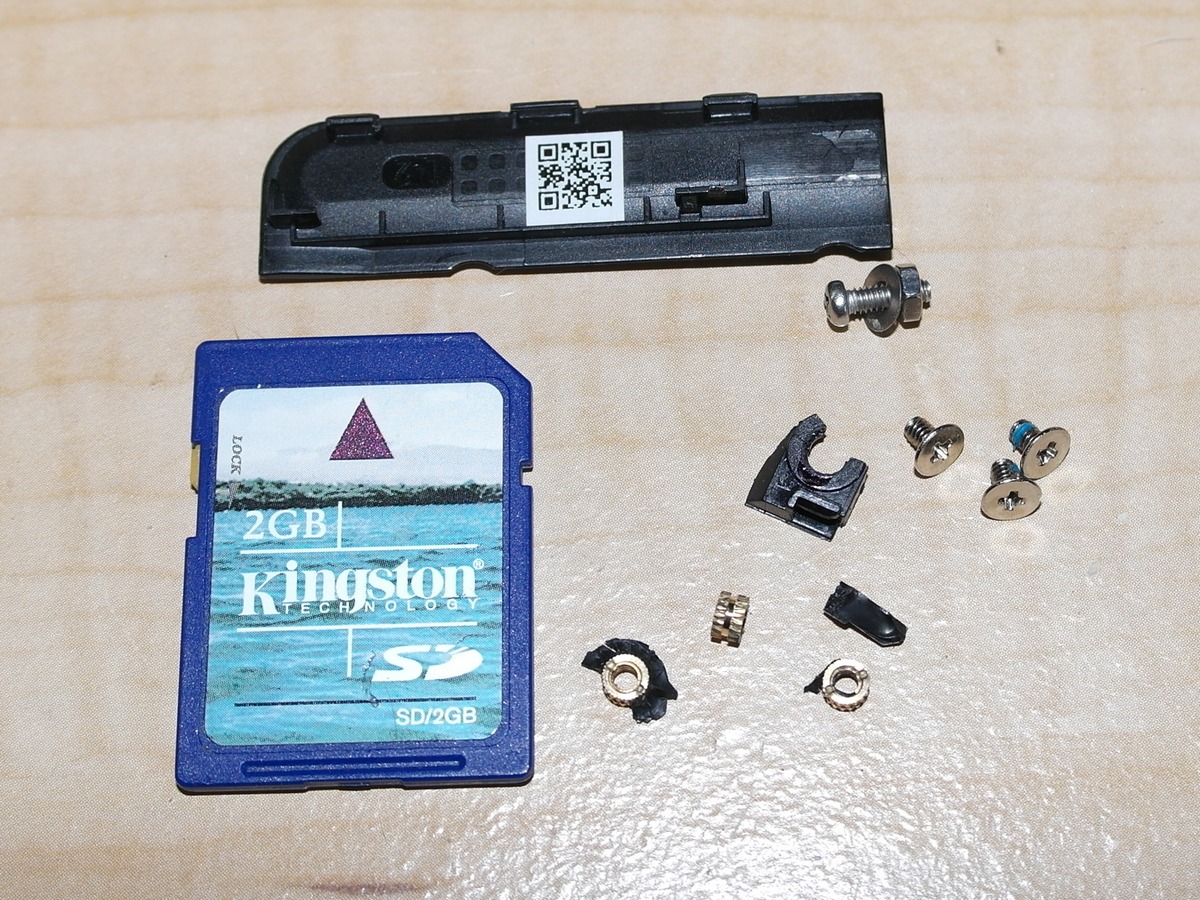
Tools: Phillips head screwdriver for small screws, drill, 5/64″ drill bit, small pliers, some tweezers maybe, a knife to cut the epoxy
Stuff you will use: epoxy, M2x6 bolts with nuts and washers, motor oil, a wooden matchstick to apply and pack in the epoxy
I used JB Weld WaterWeld epoxy ($6). You will use hardly any, but this is a putty that you slice a piece off of a roll and knead until it is mixed and then take small bits and apply them to the damaged area of plastic to build it back up. I ordered a whole bunch of bolts and washers from Amazon ($9) since I didn’t know what size I would need and Home Depot sells bolts, washers, and nuts separately so they can make as much money as possible. Again, I only needed 3 bolts, nuts and washers from the whole kit, but for less than $15 I was able to fix a $500 laptop, plus I have plenty of leftover parts to do the other hinge once it fails.
The first step was to remove the bezel from around the screen. It is held in place with clips that pop with a little pressure as well as a line of double-sided stickum tape. I was able to remove it with just fingernails and pulling carefully, but you may want to use a credit card or guitar pick to get up under the bezel and pry it upwards. Try not to move the tape from its original location, though I lost some of it and it doesn’t seem to matter that much. This video shows a hinge repair on a similar model (Lenovo seems pretty consistently unable to design hinges) and shows removal of the bezel.
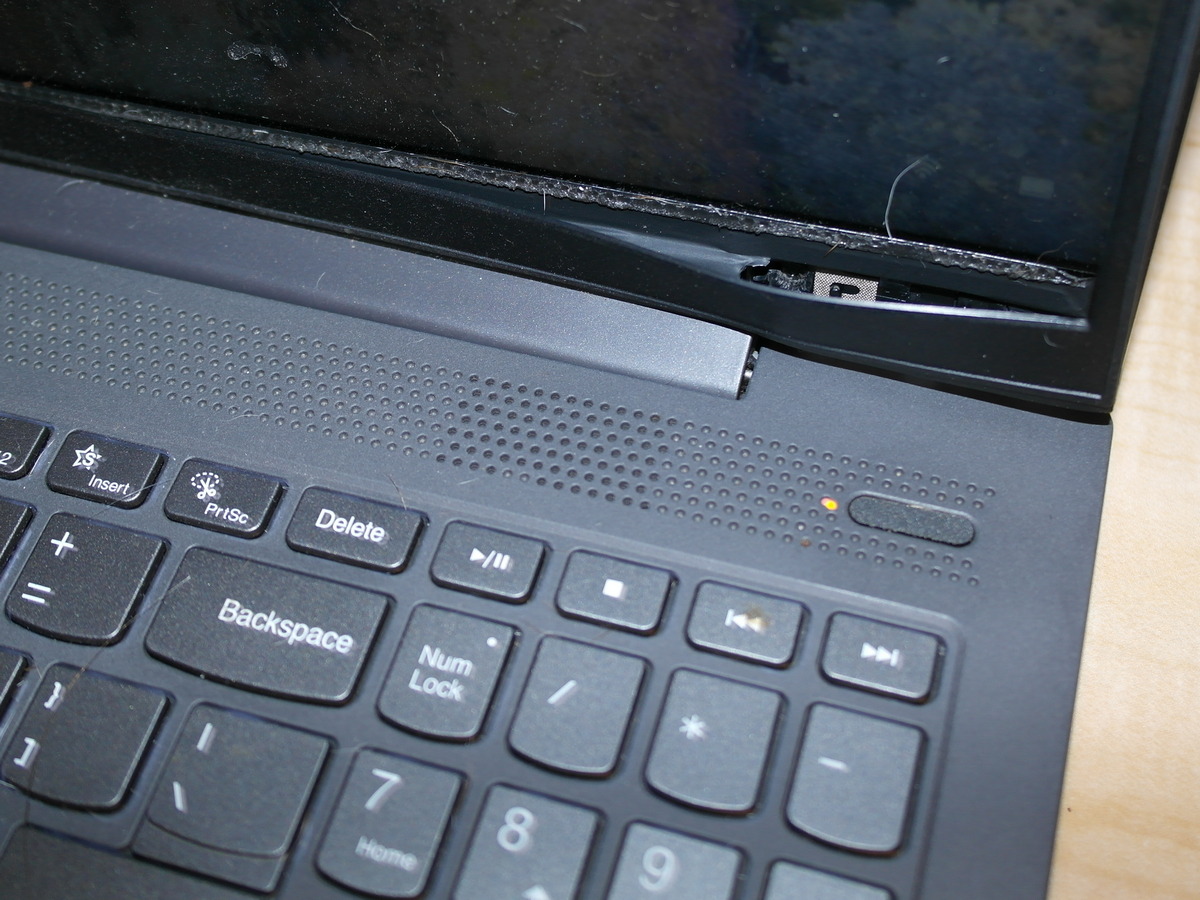
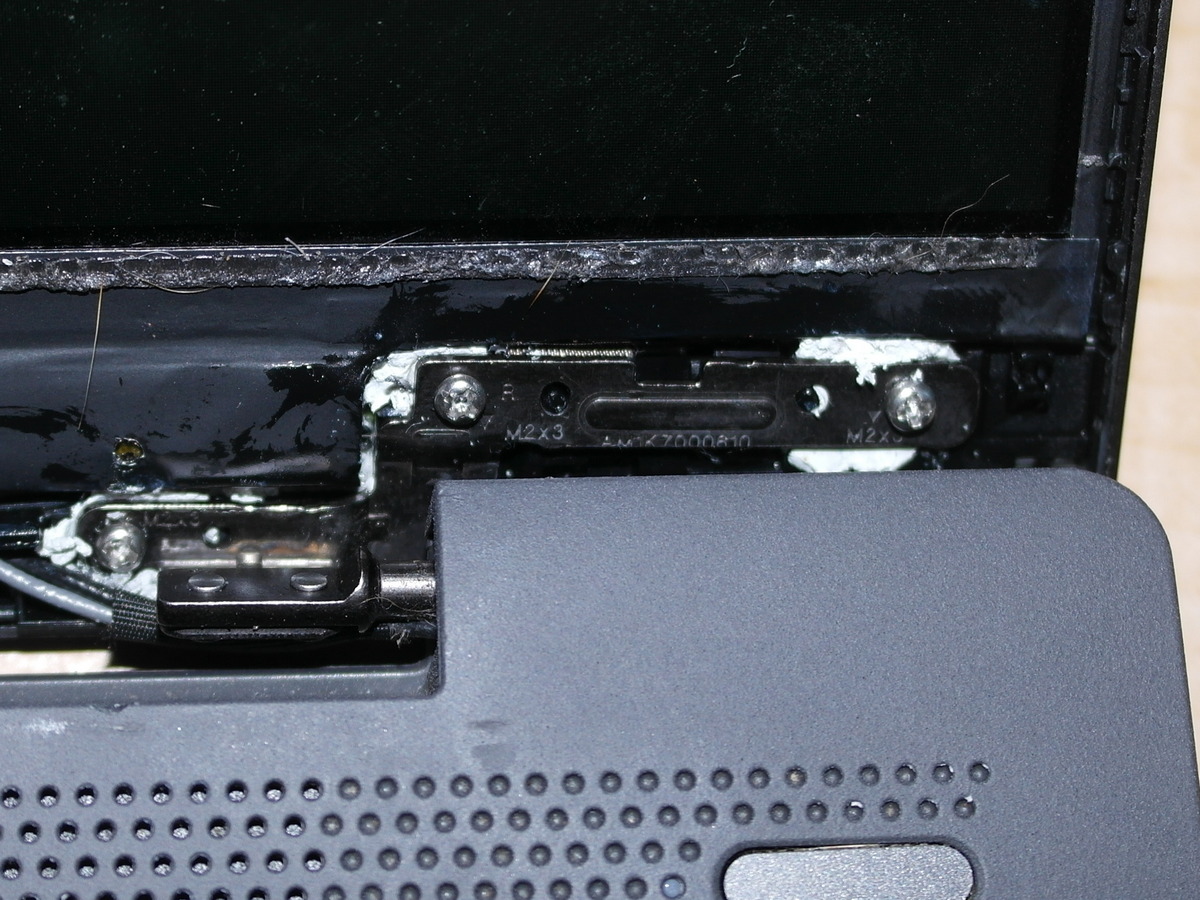
Next I needed to unscrew the Phillips head screws from the hinge, for me 3 screws holding the left hinge to the lid, which is where the damage was (pictures show the right hinge which failed later). I did not need to remove the hinge from the base of the laptop, just the lid side. Also I’m not sure where the battery is on this laptop, so even though it was unplugged and shut down, sometimes I would hit a button and it would come back on (there is probably a way to disconnect the battery by removing the bottom panel, but it isn’t necessary). Once the hinge was detached there was enough play with the lid (now only attached at the right hinge) that I could then shift the laptop lid a little to get access to the broken plastic underneath the hinge. Try to get rid of any loose plastic. All three of the screw mounts had cracked on mine so the brass anchors riveted into the plastic to receive the bolts came out with the cracked plastic (see picture). If the brass anchor is still in place securely I am not sure how you could remove it (maybe cut through the surrounding plastic with an x-acto knife), so I didn’t try to fix the hinge on the right which is still holding for now.
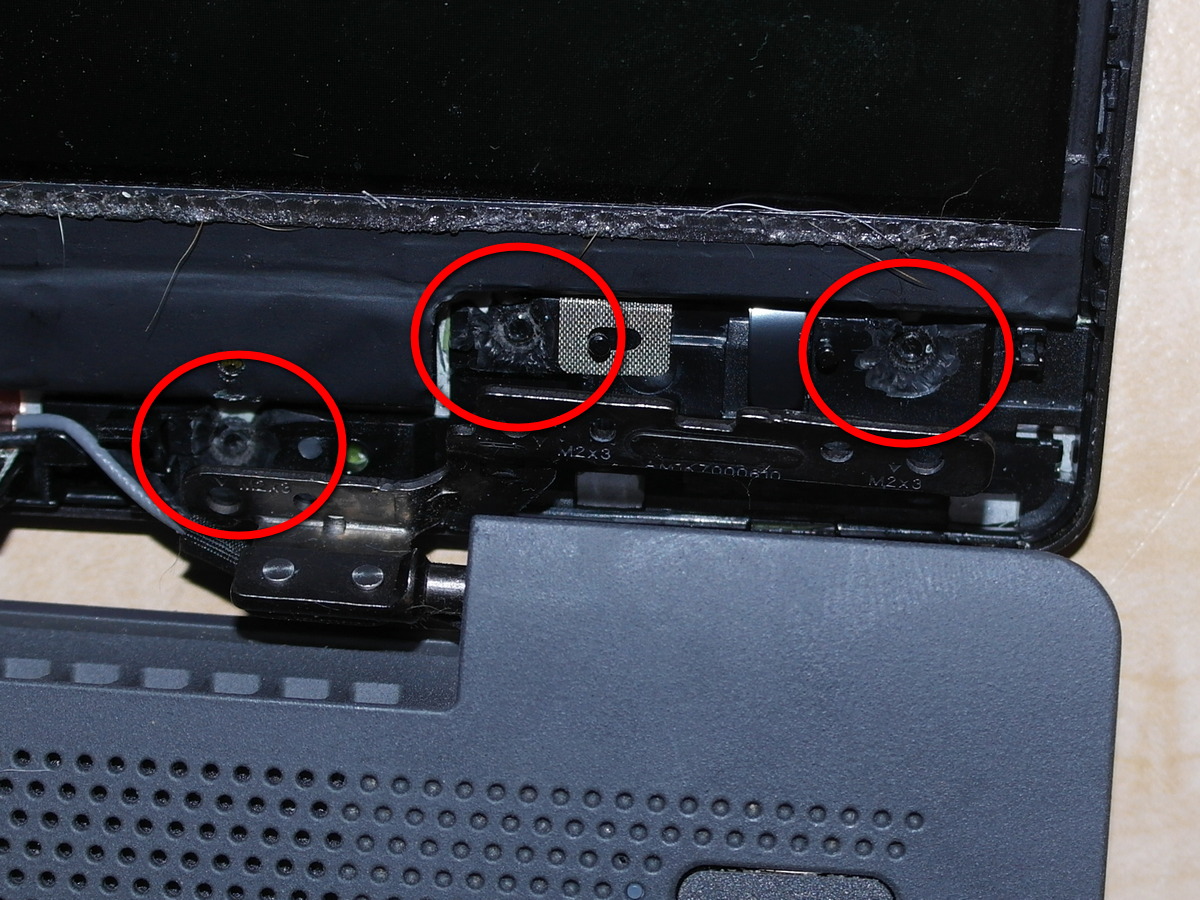
When putting the epoxy in place you want to build up a good surface for the hinge to bear against. There were some little plastic nubs that fit up into the hinge that were still intact which were a big help in positioning the hinge. These fit in the smaller holes in the hinge. The bigger holes are for the screws. To figure the size of bolt I needed I picked the biggest drill bit that would fit through the hole in the hinge, which was 5/64″ which is also right at 2 mm. For the epoxy to work, you need to cut a big enough piece off of the roll that you can knead and mix it thoroughly, so definitely cut more off than you need. I packed in the epoxy at each bolt location using a wooden matchstick as a tool and then put some oil on the hinge so it wouldn’t stick to the epoxy and then pushed it together with the laptop open about 135 degrees. Make sure you match the angle of the hinge with the angle of the lid. The hinge is very stiff, but will move. You want to have enough epoxy in there that you form a a nice impression of the hinge in the epoxy at each screw location and some epoxy may ooze into the screw holes, which is fine since you will drill it out. You don’t want epoxy all over the place because there are wires and stuff that need to be able to move freely.
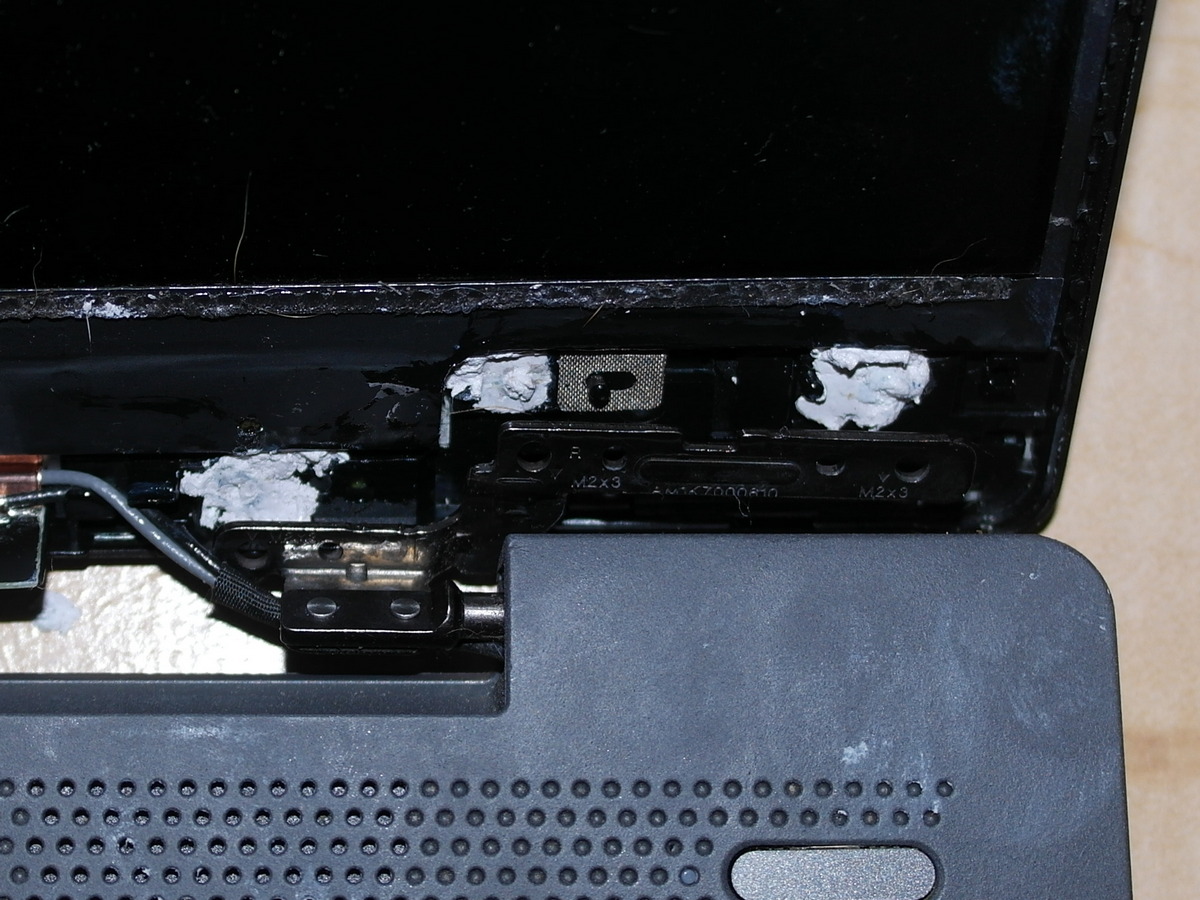
Then you can shift the hinge away from lid again and let the epoxy cure fully. The stuff I had was supposed to be hard in 1 hour, but I waited more like 3 hours, checking how hard it was with a wad of leftover mixed epoxy putty.
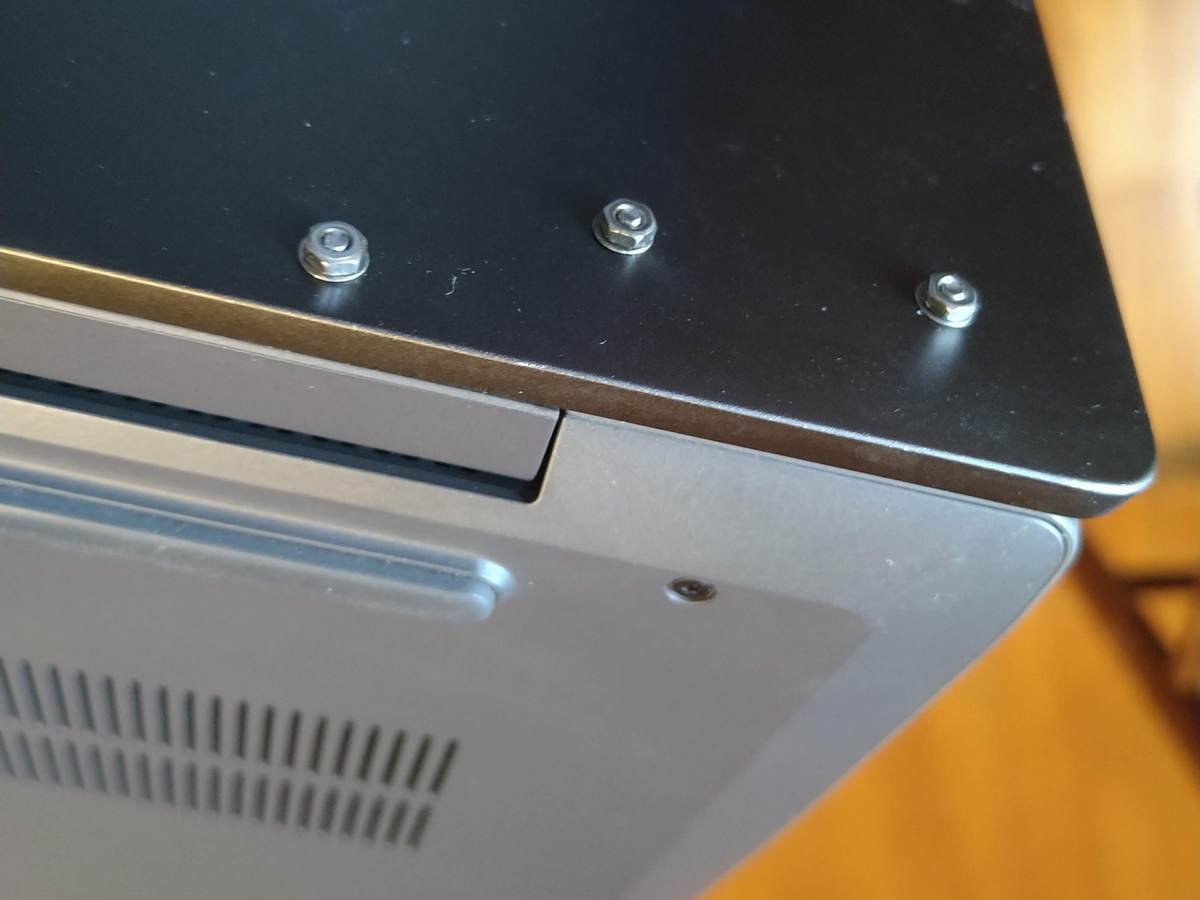
Then it was just a matter of realigning the hinge again and using the hole in the hinge as a guide for my drill bit. I didn’t have any trouble drilling through the epoxy, plastic, and out of the aluminum case. Smooth out any burrs where the drill comes out. The 6 mm long bolt seemed to be long enough to get one washer and one nut on the outside of the case, but the kit had a bunch of longer ones (the kit also has lock washers, but I didn’t use those). Holding the nut still with the pliers, I used the Phillips head screwdriver to tighten the bolts. Don’t overdo it, but you also don’t want it to ever loosen. I did one bolt at a time so that the first bolt held things together while I worked on the second and third ones.
Then you have to put the bezel back which should mostly snap in place. Make sure there isn’t any stickum tape sticking out. The heads of the bolts I used were taller than the original bolts, so the bezel sticks up a little in that area, but it doesn’t scrape when opening and closing the lid. I thought about drilling a hole the size of the bolt head in the bezel so the bezel would fit over the bolt head (which would also make it easier if you ever wanted to tighten the bolts), but that would be a little tricky to position the hole just right. Also a plastic piece that covers the hinge fell off when the hinge originally broke. I think it just snaps in place, but it doesn’t seem to do much, so I didn’t put it back.
Update in June 2022: My first repair from September 2021 and the second hinge repair from December 2021 are still holding up well.
I have some small brushes and black & brown epoxy paint just for the purpose of painting over aluminum screws / bolts on various projects like this. (Our house numbers, shelving, mirror.) Nice “tidy” effect. Next time we are together…
I don’t mind that it looks bad. In fact I kind of wish it looked worse and maybe people would ask about it and I could tell them that Lenovo makes lousy hinges.
And today I joined the millions who have found out that lenovo laptop hinges are simply not up to the job. This one hasn’t had a particularly hard life – it’s not like I’ve been anywhere with it since covid kicked in. I’ve a longer guarantee from the place I bought it from but don’t really enjoy having to send my laptop off. Definitely won’t be buying another laptop from lenovo and will be doing all I can to advertise how useless this aspect of the design is.
3 months later the other hinge broke. This time I took some pictures while I worked on it. Now I have matching bolts on both sides.
I have inherited a 17” HP with both hinge contacts completely shattered. I don’t think there is enough foundation to rebuild and bolt the corners. The display cable is loose but amazingly working. The WiFi antenna is broken so I have worked with it propped up a carefully next to a Google mesh router.
If the wifi doesn’t work, I’ve had luck buying a $10 USB wifi dongle similar to a cordless mouse attachment and disabling the internal wifi card. My “desktop” laptop has one of those. Hard to see from the pictures what is going on with the hinge plastic, but I’m happy with my bolts if you can make them work. I have a bunch of different lengths you could try. Maybe look online for a repair or how to remove the bezel on that model?
The same happened to my Ideapad 5, I contacted Lenovo and they said it was a manufacturing issue with this batch (81YK) and that I could send in my laptop for repair. I will post an update when I get my device back from them.
Hi Wouter,
Any news? I have the same laptop, same issue. Would love to know how to get it repaired/replaced…
Thanks! I just did the repair. Didn’t bother with the epoxy, just removed the old bolts and put new bolts thru as you listed in your pictures. Used some Gorilla glue as ‘lock-tite’ on the nuts/washers. Excellent!
My daughter had this problem with her 16 month old ideapad 5. After some back and forth with Lenovo, they refused to cover the repair so I did it myself.
The above tutorial and linked video were very helpful but I made some adjustments based on what I had available and the damage to the monitor frame. Just as in the original post, on one side the brass hinge anchors popped out of the monitor frame and there were three divots in the plastic. The other side was intact but under strain due to the damaged other side.
I got a torx bit kit (Home Depot kit Model #70381H) to remove the plastic bottom panel. The screws are #4 torx, I guess Lenovo doesn’t want to make it easy to repair.
I found a 10 pack of 4-40 X 3/8″ machine screws and nuts (Home Depot Model# 831431) for $1.38. I used a 5/64 drill to pilot the holes in the monitor frame, using reader glasses to ensure I was getting the hole in the center of the divot. I then used a 7/64″ drill bit to size the holes in the monitor frame for the #4 screws. 7/64″ is about 3/1000ths smaller than a #4 machine screw so you will have to twist the drill a few degrees to get the hole sized properly for all the holes you drill. Since I had the whole thing apart I elected to modify the operable hinge mount as well. For that side I did the same thing but the 5/64″ drill bit helped cut out part of the brass anchors and keep the hole centered and the 7/64″ sized them. After drilling the monitor frame I vacuumed out the debris. The three holes in the hinge that fasten the two hinges to the monitor frame are smaller that 7/64″, so I drilled all six holes out to 7/64″ as above.
The monitor frame had enough material remaining so I didn’t use epoxy, just the screws,and it is very solid.
I did have to grind down the screws as they protruded from the frame by 1/8″ or so.
Dad power! Thanks for writing. I used metric bolts because the computer does, but it’s not like these bolts need to match. The epoxy is just filler so that is great that people are getting good results without it. The putty epoxy is pretty easy to work with, unlike liquid epoxy, but you need so little that maybe it doesn’t really matter. One person on the forum said that after Lenovo repaired their laptop, the hinge failed again. They are just replacing broken parts with the same new parts, so it makes sense they would get the same result. I think the bolts are the better long term solution unless they redesign it.
Hi Ted my hinges are broken and the plastic around them is also broken/gone. The lid is hanging by two wires. I don’t want to try and repair. Its way too far gone. Can I just cut them and use the laptop as a desktop?
thank you
I wouldn’t cut the wires. If it can’t see the camera, speakers, and/or screen, it may not work correctly. Though my repaired hinge is still working fine, I use my Lenovo as a desktop and rarely open it, setting it to wake up when I press the spacebar on my external keyboard (sometimes, I still need to open it and hit the power button).
Thank you very much for this great blog, Ted. I appreciate it!
“UPDATE: Lenovo seems to acknowledge that this is a manufacturing defect and will fix computers with the problem, even if they are out of the 1-year warranty! You have to open a support case and then post the case number of the support forum and they will contact you to fix it. Dozens, of people have been able to get their laptops repaired via that forum.”
I have a warranty and they still refused to fix it! You can read more about it here:
https://forums.lenovo.com/t5/General-Discussion/Broken-Hinge-on-IdeaPad-5-15IIL05-Laptop-Type-81YK/m-p/5063546?page=48#5954718
A little request: I hope you can edit the part I quoted above because it’s not 100% true and is what made me send it back to Lenovo. I should have just followed this blog in fixing it myself!
Thank You,
Aq-anon
I have updated my update. Some people did get repairs, but unfortunately they are still acting like this is a case of abuse. Sorry they did not stand behind their product any better than that.
Actually, mine is under warranty, almost running out soon. They still refuse… It definitely is abuse. Thanks for the update =)
Hinge failures stem directly from a lack of proper attachment to a plastic screen body. Laptops have become thinner and bezels have also shrank leaving very little screen stability. This design has also contributed to hinge weakness and eventually failures. All the PC makers have little choice with a demand for light and thin laptops. Back when laptops were thicker, had wider bezels and were generally built like a tank. You never saw as much hinge issues. Hinges then attached to a metal frame that surrounded the screen. At the very least it was a much wider hinge system that attached to a wider area.
Couple tips is open screen from center position always. That puts equal pressure on both hinges. Also,
open and close screen slower especially if hinge has good resistance. That puts less shock on hinge and a more gradual pressure.
This is not a problem exclusive to Lenovo. HP hinges break too. I have a Lenovo “junkpad” and 2 HP laptops. All three have broken hinges. One of the HP’s will only show a display in a “sweet spot” which is very difficult to find. Seems not many companies take pride in their products anymore! Where is the quality?